Transfer Money Online from Axis Bank to Other Axis Bank Account


Axis Bank Login

You can easily transfer money to Payee account who is holding an account of an Axis bank and you are also holder of an Axis Bank Account. For a small task you don't need to bother  about writing a cheque or do not need to go to payee place for giving a cash.You can transfer online money in few steps If you have Internet banking Login ID, Login Password and Transaction Password with you.


What is Login ID: Login ID is your customer ID or Username which  is use to login in  Axis Bank website.


What is Login Password : Login Password is password which is you need to provide when you are log in into Axis Bank Website.


What is Transaction Password : Transaction Password is a another password which is use for validating your transaction like transferring amount,adding payee, deleting payee etc.

If you do not  have Internet facility on your account then contact to branch of Axis Bank.You need to register first Payee details, follow steps as written below as I have explained in the details.

Register Payee / Beneficiary Details –

1. Open website www.AxisBank.com
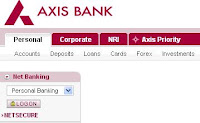
2. Left Side Net Banking Section – Click on Logon
3. Click Here to Continue
4. Enter your Login ID and Password.
5. Click on Submit Button.
6. Choose Transfer Funds Link from Grid.
7.Choose Other Axis Bank Account from Transfer Funds to.
8.Click on Register New Beneficiary Button.
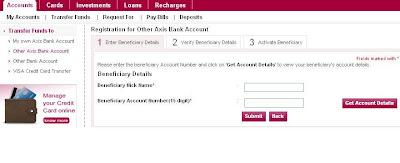
Register a Beneficiary for Axis to Other Axis Bank
Register a Beneficiary for Axis to Other Axis Bank

9. Enter Beneficiary Details -

  • Enter Nick Name ( You can take anything what ever  you want )
  • Enter Beneficiary Account Number – Recheck bank account number once more after entering to avoid human error.
  • Get Account Details to see the same person to whom you want to transfer the money, this record  will be displaying from bank data itself.
  • Click on Submit


10.Verify Beneficiary Details-

  • Enter your Internet banking Login ID and Transaction password.
  • Enter Net secure code which has sent on your mobile.

11. Activate Beneficiary / Payee for  Making a transaction.

( If your mobile is not registered then first need to register your mobile with bank and you should also have Net Secure Service from Axis Bank)

So Now you have added a successfully Payee and activated Payee for a Fund Transfer in Axis Bank from Axis Bank.

Steps for Fund Transfer from Axis Bank Account to Other Axis Bank account –

1- Select Other Axis Bank Account from Left Menu from My Accounts > Transfer fund to.Right side a  List of Payee will be displayed in the list.
2-  Select added Payee from circle click.
3- Click on Pay Now Button
4- Enter Payment Details -: Enter Payment Amount which you need to transfer to Payee.( For checking you can choose very less amount like 50 - 100 Rs.
5- Payment Account No- From where you are transferring money to Payee account.
6- You can payment remark to see the transaction like “from Your Name”.
7- Click on Pay button once again.
8- Verify Details -: Enter your Login Id, Enter your Transaction password and Net Secure code which has sent on your mobile.Some time bank is not asking for the Net Secure code in case of less amount transfer.
9-    Click on Validate
10-  Confirmation : - You have successfully transferred amount to Other Axis Bank account.
11-  Check status of your transfer in Other Axis Bank account - Status Enquiry, close Website or Browser after doing transaction.

It might take 1-4 working days to transfer your amount to Payee account, Generally credited in second day in a Payee account.

Keep in Mind Don't / Does While a Money Transfer  -

  • Do not share Internet banking Login ID, Login Passwords, Transaction Password with others, even need not to share with customer care or in any mail.
  • Do not do any transaction in front of other person.
  • Do not send ATM Pin , Username and Passwords in Mails to anyone.
  • Do not store username and password in e-mails /  mobiles.
  • Do Sign out / Log out after completing a Transaction / Transfer. 
  • Close Browser  completely after making a Transaction / Transfer.

How To Setup Google Webmaster Tool For Your Website or Blog

Google has provided free Reports to see you’re crawling and indexing of Pages. You can get answers of all the questions? How many Inbound links and outbound links are linked to your website? How many search queries have done for your website or blog? How many clicks have done so for search queries? What is position of your website in Google Search base on Google Keywords? How many page impressions are being done every day for your website? How many pages are visible in Google Search? You can analyze a search data to improve Page Ranking. Google Tracks all the links all over web and if anyone linked to your website then Google Webmaster Tool will display this in the report. If your page or website is not indexed then you can tell to Google by submitting sitemaps that this website or particular web pages are need to be indexed.
Google Webmaster Tool Snapshot

I will be covering first how to setup webmaster tool for your website or Blog and also I will show you how many reports are essential for analyzing a Data.

Setup a Google Webmaster Tool in Few steps:
1. Login in www.google.com/webmasters/tools/ with Google Email and Password.
2. Click on Add a Site Button
3. Enter the URL of a Website or Blog which you like to manage.
4. Verify Ownership:
Choosing below any option you can tell to Google that I am owner of a website or a  Blog.
  • Add a DNS record to your domain’s configuration -: If you have DNS configuration with you, then you can enter Google Verification token in the setting. Select your domain provider.
  • Add a Meta tag to your site’s home Page -: This is very simple option to verify the ownership. You need to put a HTML Meta Tag on your site to verify an ownership.
  • Upload an HTML file to your Server :- If you are uploading Google verification HTML file on your server as given instruction by selecting an option, will secure to Google that you are owner of a website
  • Link to your Google Analytics Account :- If you have already setup a Google Analytics Account then choose this option, No need to required further verification for setup of Google Webmaster Tool.

I recommend you the second option (Add a Meta Tag to your site’s home page), If you do not want to choose others. As you select the second option the Meta tag will display on the same page, You need to simply copy the Meta tag and put inside head tag in the HTML of Your webpage.If you are blogger user then you need to follow below steps to put the Google verification code.

How to put Google verification code in Blogger :-
  •  Login into Blogger account
  •  Go in Design > Edit HTML Tab
  •  Search for <title> Tag
  •  Paste Google Verification code after the Title Tag.

5. Click on Verify Button

You have been successfully verified by Google for your ownership of the website or Blog.Later on you can  see the status of your Website or blog using below listed features.

List of Google Webmaster Tool Features -:
  • Search Queries - You can see status of Search impressions, Queries and no of clicks done in Google Search when your website appeared in Google web search.
  • Links to your Site - It will display the list of internal links and external links, internal links are inbound links which are linked with your Website pages. External links indicates that how many others have linked to your website or Blog.
  • Keywords- Google found these keywords when crawls your website.
  • Crawl Error- It shows list of errors while your website has been crawled by Google, Generally it shows error for broken links, missing URL, deleted pages.It also shows error for restricted URL or pages.
  • Sitemaps - If  your website or a particular page never been indexed to Google then you can tell to Google for indexing the website or page by submitting the sitemap.

Advantages of having Internet At Home

What are advantages of the internet, why we should pay for the internet, what we can do using an internet, there a lot can be done on internet? Broadband connection, Data Card, GPRS and Wi-Fi connection can change your life. You can get many tasks done through the internet.

Listen / Download Music and Movies from Internet –:
We can get any music from an internet very easily. Enormous music websites available on internet, we can listen song online and also can download the song on the computer.You may download movies also from internet.
Music Websites –
www.songalways.com
www.bollyexclusive.com
www.raaga.com

Search Job Online -:
You can search job through the internet, no need to go door to door for searching a Job. You can upload your profile or resume on Naukri.com, Monster.com and Shine.com to get interview calls and also can search relevant job on these websites.


Internet Banking -:
Now-a-days need not to write a cheque  to give amount of money to anyone, You can easily transfer money from one bank account to other bank account using an internet banking facility through the Bank Websites.

Recharge through Internet -: 
Recharging DTH, Mobile become an easy through the internet. You can recharge your any Mobile, DTH service Tata Sky, Big TV, Airtel, Sun TV, Dish TV etc quickly through the internet any time in 24 hours.

Search Information on the Internet -: 
Enormous information available on the internet, you can easily search whatever you want. If you are doing study then you can easily search contents related through your subject or Title.
Search Engines-
www.Google.com
www.Bing.com
www.Yahoo.com

Send Email and Documents -: 
You can write an E-mail to your friend, family and your belongings. Even you can send photos, documents though the attachment using any email service- GMail, Yahoo Mail etc.
Email Services -
www.Gmail.com
www.Yahoo.com
www.RediffMail.com

Online Shopping -:
In today's life you can purchase a lot of products and items through the internet, many websites are available on internet for products buying and selling.
Shopping Websites -
www.ebay.in
www.shopping.rediff.com
www.Shopping.Indiatimes.com

Book Online Movie Ticket -:
You can book easily your movie tickets through the internet.
Booking websites-
www.bigcinemas.com
www.bookmyshow.com

Search Property on Internet -:
If you are looking for a property then you can easily done through the internet. You can search property for a rent, buy and sell. You can put your requirement on the website and Property Agent will call you.
Property Websites -
www.Magicbricks.com
www.99acres.com
www.Makaan.com
www.IndiaProperty.com

Online Training and Courses -:
There are training and courses which are available on internet from most of the university and institutions. You can do online training if you are looking for that.

Online Reservation -: 
Need not to go any Reservation center for your Travelling Reservation Ticket. You can make reservation of any flight, Train and Bus from the internet only.
Reservation Websites –
www.irctc.co.in
www.makemytrip.com
www.cleartrip.com
www.Yatra.com
www.redbus.in
www.erail.in

Download Software Through Internet -:
You can easily download software from an internet for your computer, mobile etc. For an Example search on www.google.com to download new browser Google Chrome.

Video Calling & Chatting with Friends and Belongings -:
It’s been easy to chat with family through the internet using famous source as yahoo messenger and Gtalk, Skype and Facebook  You can talk using a microphone to friend and family through the internet even outside of the country, if you have webcam with you then you can see to friend or family on computer itself while talking or chatting with them.

Social Networking -:
You can connect to your friend through social networking websites and can see and share daily updates, photos, profile of your friend and family.You can even send your messages, scraps too.
Social Networking Websites -
www.Orkut.com
www.Facebook.com
www.linkedin.com
www.Twitter.com

Blogging & Website -:
If you have interest in writing and you have hobby to write then you may start to write on blog and you may express your views to internet users.

    Transfer Money Online From SBI to SBI Bank Account

    First we need to add Payee for Making a transfer, adding payee is like adding phone number in your mobile phones.As you can make call any time on saved phone number, any time you can make further payment, Need to register only once in your account.


    Steps to Register Third Party Payee / Beneficiary –:
    1. Open Website www.onlinesbi.com
    2. Click on Personal Banking from right side
    3. Click on Continue to Login
    4. Login to Online SBI with your username and password.
    5. Choose Tab Menu Payments / Transfers
    6. Select Third Party Transfer
    7. Click on link – Click here to add a new third Party
    8. Enter Profile Password
    9. Enter Name of Payee as per Bank record, Payee is to whom want to transfer money.
    10. Enter SBI Account Number
    11. Confirm SBI Account Number with entering same account number.
    12. Set Max Transfer Limit for this Payee.
    13. SMS Alert for new beneficiary will be sent on your mobile number.
    14. As you click on Submit Button, One Time SMS Password will be sent on your Mobile for self approval of third parties. If your Mobile is not register with Bank then approval will be process from Bank.
    15. You have to approve beneficiary for making a Transaction.

    Your Payee / Beneficiary added successfully and approved by you, now you can make money transfer to Payee.

    Steps to Transfer Money in Third Party Payee Account -:

    1. Select Third Payee transfer and select third payee account from List.
    2. Select Payment Option
    a) Pay Now – It will proceed for instant payment from today itself and payment will be debited from account today itself.
    b) Schedule Later – You can schedule the Payment date and payment will be debited from your account same date.
    c) Standing Instruction –You can make payment multiple times for same month after particular days, select start day for making same amount of payment multiple times in repetitive way.

    3. Click on Confirm

    4. Enter SMS password which has sent on your mobile for validating secure transaction, if fewer amounts to transfer then bank is not sending an SMS password.

    After entering SMS password, you will get the Message payment has done successfully, you can check your balance. For Learning transfer process you can transfer 1-100 Rs first.


    Don't / Does for a Money Transfer  -
    • Do not share Internet banking username and both passwords with others, even need not to share with customer care.
    • Do not do any transaction in front of other person.
    • Do not send username and password in Mails to anyone.
    • Do not store username and password in e-mails / mobiles.
    • Do sign out / logout after making a Transaction / Transfer. 
    • Close Browser  completely after making a Transaction / Transfer

      Recharge Tata Sky Online through Any Bank or Debit Card or Credit Card

      Recharging a DTH Tata Sky from Home is task of a minute , no need to go on shop to purchase recharge coupon, If you have an internet at home then you can do this quickly in a minute any time.


      Register First With Tata Sky Website –:

      1. Open website www.Tatasky.com
      2. If you don not register your subscriber Id with Tata Sky website, then click on register button first.
      3. Enter your Subscriber ID, and choose any password which you can remember easily for further login, Password must be between 6 to 8 character and without spaces. If caps lock is ON then your whole password will be capitalized whenever you are login you have to make caps lock on before entering the password.
      4. Enter your email Address if you have.
      5.Enter your Mobile Number , which will called as Registered Mobile Number, after registering this number through SMS only you can activate any show channels and get watch / buy movie to watch at home itself. You can use your Mobile Number for Login User Name too in Login Screen.
      6. If you have children – then select the age groups of your children.
      7. You can choose whatever else you have at your home. You can choose none of the above if you don’t have items at Home.
      8. Select I agree.
      9. Click on Submit Button, You have successfully registered with Tata Sky.

      Login into Tata Sky Website and Recharge Online –:

      1. Login with your Subscriber ID or Mobile Number and Password.
      2. Click Account Recharge Menu from Top, Select Credit Card / Net Banking option.
      3. Enter Recharge Amount and click on Recharge.
      4.  Check Verify details
      5. Select Payment Mode
        a) Credit Card – You can recharge Tata Sky by using your Credit Card. Enter your credit card details.
        b) Debit Card – You can also recharge Tata Sky by using Debit Card. Enter your Debit Card details.
        c) Net Banking – You can recharge through online internet banking, Select any banking and enter Internet banking Login and Password, Transaction Password to make payment fast. This is very easy service if you have already your internet banking from Bank.
      6. Make on TV while doing a Recharge or Send SMS HR on displayed Number on your TV for Resume service.
      7. Check your Balance from My Account Menu > My Account Balance, added recharge amount will display in your account Balance.


      Don't / Does for a Money Transfer  -:
      • Do not share Internet banking username and both passwords with others, even need not to share with customer care.
      • Do not do any transaction in front of other person.
      • Do not send username and password in Mails to anyone.
      • Do not store username and password in e-mails / Mobiles.
      • Do sign out after making a Transaction / Transfer. 
      • Close Browser  completely after making a Transaction / Transfer.