Transfer Money Online from Axis Bank to Other Bank Credit Card

You need not to call agent for a credit card payment,You  need not to go in bank for a credit card payment. From internet home or office you can do this task very quickly and easily and it saves your time and payment can be credited quickly on the time to time. We would call this is Card to Card Visa transfer from Debit Card to Credit Card Transfer.You can transfer from Axis Bank to Axis Credit Card or from Axis Bank to any Credit Card.This service is only applicable for Visa Credit Cards.


Register Payee Details –


1. Open website www.AxisBank.com
2. Left Side Net Banking Section – Click on Logon
3. Click Here to Continue
4.Choose Transfer Funds option.
4. Enter your Login ID and Password.
5.Select Visa Credit Card Transfer from left menu.

7. Enter Benificairy Details-
  • Enter Nick Name – Enter Name of your Credit Card, If  ICICI card then write ICICI with holder Name. (You can write anything as you want. This is for identification of your card while you do the Payment)
  • Enter Beneficiary Card Number – Recheck Credit Card Number once more after entering to avoid human error.
  • Check check box – I have read the disclaimer & accept all the terms and conditions, if you want to read term and condition then you can read by pressing button of Disclaimer.
  • After all click on Submit Button.

11. Verify Beneficiary Details :-
  • Enter you login ID,
  • Enter Transaction Password,
  • Enter Net secure code which has sent on your mobile.
     (If your mobile is not registered then first need to register your mobile with bank and you should also have Net Secure Service from Axis Bank)


14. Activate Beneficiary : Finally Activate Beneficiary / Payee  for doing a payment.

So now you have added a successfully Payee and activated Payee for a Fund Transfer on Visa Credit Card.

Visa Credit Card Transfer from Axis Bank Account  to Other Bank Credit Card –:

1- Go in Left menu - Select Visa Credit Card Transfer.
2- Click on Pay link from right side in from of selected credit card row.
3- Select one Time Payment to a Registered Payee.

5- Enter Payment Details :-
  •  Enter Payment Amount.
  •  Bill Payment Account No- From where you are transferring money to Payee Credit Card Number.
  •  You can write payment remark to see the details in  bank statement like “from Your Name”.
  •  Payment Date – You can schedule your Credit Card Payment date and it will be proceed for that date, if you want to enter the payment for today then enter today date.
9- Click on Pay button once again.

10.Say Next

11- Verify Details : -
  • Enter your User/ Login Id, 
  • Enter your transaction Password
  • Enter Net Secure code which has sent on you Mobile .Some time bank is not asking for the Net Secure code in case of less amount transfer.
  • Click on Validate
12- Confirmation : You have successfully transferred amount to Credit Card , close Website or Browser after doing transaction.

It might take 1-4 working days to transfer your amount to Payee Credit Card, generally credited in second day from Payment Date.


Don't / Does for a Money Transfer  -
  • Do not share Internet banking username and both passwords with others, even need not to share with customer care.
  • Do not do any transaction in front of other person.
  • Do not send username and password in Mails to anyone.
  • Do not store username and password in e-mails / Mobiles.
  • Do sign out after making a Transaction / Transfer. 
  • Close Browser  completely after making a Transaction / Transfer.
Transfer Money Online from Axis Bank to Other Bank Account

You need not to write a cheque or need not to make DD.Transfer money from internet is a very easy task, need to know how to transfer money to Payee account who is holding an account of an other bank.You need to register first Payee details, follow steps as written below as I have explained in the details.
Logon

Register Payee / Beneficiary Details –


1. Open website www.AxisBank.com
2. Left Side Net Banking Section – Click on Logon
3. Click Here to Continue
4. Enter your Login ID and Password.
5. Click on Submit Button.
6. Choose Transfer Funds Link from Grid.
7.Choose Other Bank account from Transfer Funds To.
8.Click on Register New Beneficiary Button.
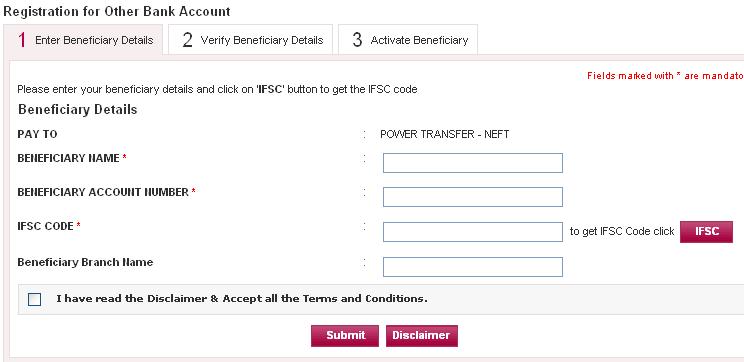
9. Enter Beneficiary Details -

  • Enter Beneficiary Name (Enter Name of Payee to whom you want to transfer the money, this should be as per bank record)
  • Enter Beneficiary Account Number – Recheck bank account number once more after entering to avoid human error.

Add Payee for Transfer
  • For Entering IFSC Code, Click on Button IFSC.
         a) Select Bank, and click on button click here to get details.
         b) Select specific Branch for same Bank, to select fast enters any alphabet which will display nearer list  of the branch bank which will start with that alphabet.
         c) After selecting branch – click on Select button.
As you Hit Select, IFSC code and Beneficiary Branch name will be populating in IFSC code Text Box.
  • Check check box – I have read the disclaimer & accept all the terms and conditions, if you want to read term and condition then you can read by pressing button of Disclaimer.
  • After all click on Submit Button.

13.Verify Beneficiary Details-
  • Enter your Internet banking username and transaction password.
  • Enter Net secure code which has sent on your mobile.
14. Activate Beneficiary / Payee for  Making a transaction.

( If your mobile is not registered then first need to register your mobile with bank and you should also have Net Secure Service from Axis Bank)


So now you have added a successfully Payee and activated Payee for a Fund Transfer.

Steps for Fund Transfer from Axis Bank Account to Other Bank account –

1- Select Other Bank account from Left Menu, List of Payee will be displayed in the list.
2- Select added Payee from circle click.
3- Click on Pay Now Button
4- Enter Payment Details -: Enter Payment Amount which you need to transfer to Payee.( For checking you can choose very less amount like 50 - 100 Rs or 1 $)
5- Payment Account No- From where you are transferring money to Payee account.
6- You can payment remark to see the transaction like “from Your Name”.
7- Click on Pay button once again.
8- Verify Details -: Enter your login Id, Enter your transaction password and Net Secure code which has sent on your mobile.Some time bank is not asking for the Net Secure code in case of less amount transfer.
9-    Click on Validate
10-  Confirmation : - You have successfully transferred amount to other bank account.
11-  Check status of your transfer in Other Bank account - Status Enquiry, close Website or Browser after doing transaction.

It might take 1-4 working days to transfer your amount to Payee account, Generally credited in second day in Payee account.


Don't / Does for a Money Transfer  -
  • Do not share Internet banking username and both passwords with others, even need not to share with customer care.
  • Do not do any transaction in front of other person.
  • Do not send username and password in Mails to anyone.
  • Do not store username and password in e-mails /  mobiles.
  • Do sign out after making a Transaction / Transfer. 
  • Close Browser  completely after making a Transaction / Transfer

Transfer Money Online from ICICI Bank Account to Other Bank Account

Now-a-days everyone want to do online payment, online transfer through internet from Home or Office, None have much time to visit a bank. As internet is growing day by day we will have to learn making online transfer, bill payment.To make online payment just a few clicks required as you have done while withdrawing money from ATM.You need to follow below steps to learn how to transfer money from an ICICI a/c to other a/c.

Who is Payee:-
Payee is to whom you want to transfer amount.An Adding payee is just a adding phone number in to mobile phones. Whenever you want to transfer money to your relatives or friend, can transfer money easily from Internet anywhere in India.

What is URN Number :- URN is unique registration number which will be sending on your registered mobile with ICICI Bank for making secure transaction and validate a owner of the account.

Adding Payee First for Transfer Process :-

1. Open website www.ICICIBank.com
2. Select Personal and click Continue to Login.
3. Login with your Internet Banking User Id and Password.
(Apply for first Internet banking if you do not have right now, Go in ICICI bank branch or you can apply online with same website www.ICICI bank.com)
4.Enter One Time Password  - This OTP password is auto generated and will be sent on your registered mobile with Bank.
5. Left menu has option of Funds Transfer, Click on Fund Transfer.

6. Three Types to Transfer the funds from ICICI Bank accounts -


Your Own ICICI Bank Account :– You can transfer money to your own linked ICICI Bank account from your's ICICI Bank account itself.


Other ICICI Bank Account :– You can transfer money from ICICI Bank Account to other ICICI Bank Account.

Non ICICI Bank Account :– You can transfer money from ICICI Bank Account to Others Bank Accounts like PNB, SBI, Axis Bank, Allahabad Bank, HDFC  Bank and others many Banks too.

7. Select Non ICICI Bank Account option to transfer money to other bank account.
8. You need to register first Payee to whom you want to transfer Money.Click on Add Payee
9. Enter Payee Name (Name must be as per bank record), Payee Nick Name (You can write any), Account Type.
10. Choose IFSC code or Location option, if you don’t know the IFSC code of Payee bank then you can select location option.
(Each branch of bank has different IFSC code which is 9 digits number, its an identification number of branch bank and written on each cheque, Ask the same from Payee for IFSC code or better to choose location if he is not able to provide you)
11. Enter City – Enter only first 3 character of city and you will be getting the list of cities start with 3 characters, Select the exact city of Payee from the List.
12. Click on Find Banks in this city Button at the right side.
13. Choose Payee Bank from the List.
14. As you say Next, URN (Unique Register Number) will be sending on your registered mobile number, you need to enter same number in Confirm Payee section for completing formalities for adding a Payee.
( This service applicable only for a Registered Mobile with ICICI Bank, if your mobile is not registered then go in ICICI Bank branch and apply for first registering a mobile, and if your mobile has got changed then also go for changing your mobile number)
15. Now you can transfer the money to same Payee from below steps.

How to Transfer Money to Added Payee :–
Repeat up to step 5 again from above for confirming a Payee.
1. Select Confirm Payee. Enter URN number which has send on your mobile number, URN number is unique registration number which is used for securing and safe your transaction.
2. Now Select Payee to Make Payment – Click on Make Payment
3. Choose Payee from Registered Payee Grid.
4. Say Next
5. Enter Transaction Amount
6. Transaction Remark
7. Pay Now

 a) If you selecting Pay Now the payment will be proceed for transferring for same day.

 b) If you are choosing payment for scheduling then you need to enter the date when this payment   needs to be processed and Choose Payment Frequency.

  • One Time Payment – Payment is not at regular basis, only for this time.
  • Weekly Payment –    Regular payment weekly on given date for same amount.
  • Monthly Payment –   Month wise payment on given date for same amount.
  • Numbers of payments – How many payments of same amount need to pay to the Payee in Particular Payment Frequency?

7. Say Next - Enter your Internet banking transaction password.
8. Enter the Digits from your debit card for given alphabets, see on back side of your debit Card ATM.
9. Say Ok
10.You have successfully transferred amount to the Payee, close Website or Browser after doing transaction.

Amount will be credited in Payee account with in 1-4 working days,Generally it credited next day in Payee account.


Don't / Does for a Money Transfer  -
  • Do not share Internet banking username and both passwords with others, even need not to share with customer care.
  • Do not do any transaction in front of other person.
  • Do not send username and password in Mails to anyone.
  • Do not store username and password in e-mails / Mobiles.
  • Do sign out after making a Transaction / Transfer. 
  • Close Browser  completely after making a Transaction / Transfer.

Create Unique Page Titles

Page Titles are playing very good role for search engine and it is part of Search Engine Optimization ( SEO ) , you need to choose very specific and unique Title for each page. If you have index page or home page then you can choose a very generic Title which will be describing only your website or blog.

Home or Index Page Title


Title Tag always exists Inside -
<head>
<title>Importance of Page Title </title>
</head>

Do's  for Pages Titles :-
  •  Create unique title tag for each and every page.
  •  Make brief and little descriptive and it has to match with page contents. 
  •  Remove unwanted keywords from title.
  •  Make most of the time, first alphabet of word capital in any Title.
Don’ts for Page Titles :-
  • Do not choose a title which has not any relation with content
  • Do not provide a Meaning less titles like untitled1, Default, Page1,  etc.
  • Do not use lengthy title, It should not more than 50-60 character including a space.
  • Do not use single title through out website or blog.
Search Engines reads title from left to right and co-relates data, base on each words written in the Title and fetch data accordingly. Google will take your page in search engines as per query asked if you are applying few small things. Title is first entry point for search engine to recognize pages or contents of any website or Blog.

Change Titles in Blogger for each Post :-


Page Specific Title


We do not have any option to change title in a Blogger for a each page, So to change a title for each post is a little tricky here, you just need to follow simple steps –

1. Login in to Blogger Account.
2. Go in Design Tab and Open Edit HTML.
3. Search for <title> Tag.
4. For a Safer side, Take a backup of your Template, Click on   Download Full Template and save the template file on your computer.
5. Replace <title><data:blog.title/></title> code with below code with given comments as well.

<!-- Below Logic to take Unique  Post Title for Each Post-->
<b:if cond='data:blog.pageType == "index"'>
<title><data:blog.title/></title>
<b:else/>
<title><data:blog.pageName/></title>
</b:if>

6. Save Template
7.View Blog in Browser.
8.To check, it is working or not, just click on your Page Title and Title will be showing in your Browser.

You might also like -:

Easiest Way to Add Favicon in Blogger

What is Favicon :-
Favicon is a very small image called as a website icon, shortcut icon, url icon and book mark icon that appears at the website URL when typing URL in the web browser at the top of tabs.Favicon has different sizes of 16x16,32x32,64x64 and 128x128 pixels.

Favicon View


Steps to create Favicon Online :-

Before creating a favicon , first create a logo or image to create in favicon, go to CoolText.Com and create and download the logo of your choice then follow these steps.

Step 1 : Open  http://www.genfavicon.com/  to create Favicon
Step 2 : Select your Image, browse by computer, only choose format of image jpeg, gif and PNG.
Step 3 : Upload Image.
Step 4 : Select size of Favicon ( 16 x 16 ) or (32 x 32), better to choose 32 by 32.
Step 5 : Click on Capture and Preview.
Step 6 : Download Favicon or download PNG format favicon.
Step 7 : Save Favicon Image in your computer.

Update Favicon in Blogger in 3 Steps-:

Step 1 : To upload favicon in blogger Login in www.blogger.com
Step 2 : Now upload Favicon image in blogger in the Layout Tab, See Top area of Layout.
Step 3 : Save Template.

I think you  have added successfully favicon in your blog, Check your blog in your Browser.