Online Recharge Your Prepaid Mobile Through ICICI Bank

If your mobile balance has finished and you want to recharge your prepaid mobile or want to fill talk value amount in your mobile through ICICI bank account then you can easily recharge it but to recharge prepaid mobile, you should carry two things with you. First thing is required your ATM card and second one Internet Banking Transaction Password. If you have two things with you then you can recharge your mobile from your ICICI Bank any time.

To recharge your mobile from ICICI Bank simply you need to follow below steps:
1. Open website www.icicibank.com
2. Click on Login -Personal Button
3. Login with you Internet Banking Username and Password.
4. See left corner – Click Prepaid Mobile Recharge
5. Enter your Prepaid Mobile Number
6. Choose Operator – means which SIM you are using.
7. Choose circle – Which area you are belonging, means from where you had taken your SIM.
8. Debit Account – its By Default selected your account, No need to select.
9. Enter Recharge Amount by which you want to recharge your mobile. If you do not know which recharge amount you need to put for this operator see view details link which is in bottom line at right side.
10. Simply enter your Transaction Password.
11. Enter the digits from back of ATM debit card.
12. After done this, you will get message from the operator that recharge has been done successfully with a particular amount.

You can recharge your mobile through ATM Machine too.You can have same facility from other banks also.You can call to customer care  to understand a procedure if you are not able to make online recharge online.
To know customer care number of any Banks Click here - Bank customer Care Numbers

You might be also like -:

How To Know Your Pan Card Number If Lost Or Generated

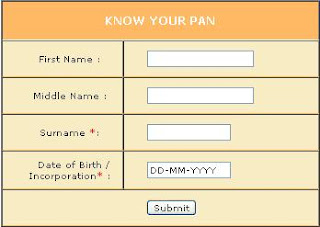
Income Tax Department facilitates the service in which you can simply know your Pan Card number if you have lost the pan card and want to apply for a duplicate Pan Card but you don’t remember the pan card number then you can simply get the pan card number only providing Your Surname and Date Of Birth. For Relevant details you can also provide first name and middle name .You can not apply further a New Pan Card If lost or Damage. It is an offence,You can apply only for a duplicate Pan Card as same as you had earlier.
Know Your Pan Card Number If Lost Or Generated
Image: Know Your Pan 

If you have applied for pan card and want to know status of Pan Card then also you can visit below link to get the Pan Card number. If your Pan Card exits it means Pan Card have been created or generated by Income Tax Department.

Click below to know your Pan Card If Lost or Generated - https://incometaxindiaefiling.gov.in/portal/knowpan.do

Date of birth should be entered in DD-MM-YYYY format means first enter (Date–Month-Year)
As you enter all the details – it will give you Pan Number, First Name, Middle Name, Surname and Jurisdiction Code. This code indicates location and other details from where you have applied the Pan Card.


What is Pan Card? 
Pan card is Permanent Account Number of 10 Digit Unique Number which is used for any financial transaction, Pan Card number is generated by an Income Tax Department. None can have two Pan Card. It is offence to carry more than 1 Pan Card.

    How To Speak English Language Little Stylish

    Everybody want to speak English, it’s become an essential part of life. I think every place you need to speak in English a little. I would say you must speak English often so you could build up your confidence. I am covering today way to speak soft and very clear. Soft Spoken English makes a very good impression on others.When you are questioning to someone, asking something, you can ask very softly to someone and it leaves a good impression.

    Suppose You want to say someone –


    Have you checked my mail?
    Have you done this?
    Have you replied me?
    Have you watched this movie?
    Have you read today’s new paper?
    Have you made request for creating my mail id.
    Have you checked documents which I have sent you yesterday?

    These above sentences are right for speaking but if you feel there is someone who is elder then you and you are giving little respect. We must speak very soft when you are making conversation to your Boss, Client, and Customer.

    You should start these above sentences with- 

    Did you get chance to check my mail?
    Did you get chance to do this?
    Did you get chance to reply me?
    Did you get chance to watch this movie?
    Did you get chance to read today’s news paper?
    Did you get chance to make request for creating my mail id.
    Did you get chance to check documents which I have sent you yesterday?

    Avoid uses of "Tell Me". Use "Let me know" in place of.

    Tell me when you back.
    Tell me if any concern.
    Tell me as you done this.
    Tell us as you finish this work.

    Start with Let me know or Let us Know all above sentences. 

    Let me know when you back.
    Let me know if any concern.
    Let me know as you done this.
    Let us know as you finish this work.

    In place of "Can", Using "could" is better to make little stylish English.See examples -

    Can you give more examples on this?
    Can you pass paneer please?
    Can you ask him to come here?

    Could you give more examples on this?
    Could you pass paneer please?
    Could you ask him to come here?

    Do not worry - Use "not to worry" some places instead "do not worry".

    Need not to worry, I will take care of it.
    Not to worry, I will handle it.

    There are many more examples which will make stylish English. Make your practice of soft spoken English.Try to notice others, how they speak.

    Transfer Money Online from Axis Bank to Other Axis Bank Account


    Axis Bank Login

    You can easily transfer money to Payee account who is holding an account of an Axis bank and you are also holder of an Axis Bank Account. For a small task you don't need to bother  about writing a cheque or do not need to go to payee place for giving a cash.You can transfer online money in few steps If you have Internet banking Login ID, Login Password and Transaction Password with you.


    What is Login ID: Login ID is your customer ID or Username which  is use to login in  Axis Bank website.


    What is Login Password : Login Password is password which is you need to provide when you are log in into Axis Bank Website.


    What is Transaction Password : Transaction Password is a another password which is use for validating your transaction like transferring amount,adding payee, deleting payee etc.

    If you do not  have Internet facility on your account then contact to branch of Axis Bank.You need to register first Payee details, follow steps as written below as I have explained in the details.

    Register Payee / Beneficiary Details –

    1. Open website www.AxisBank.com
    2. Left Side Net Banking Section – Click on Logon
    3. Click Here to Continue
    4. Enter your Login ID and Password.
    5. Click on Submit Button.
    6. Choose Transfer Funds Link from Grid.
    7.Choose Other Axis Bank Account from Transfer Funds to.
    8.Click on Register New Beneficiary Button.
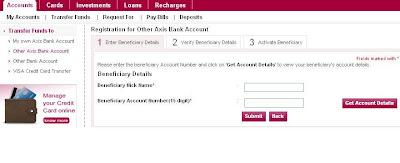
    Register a Beneficiary for Axis to Other Axis Bank
    Register a Beneficiary for Axis to Other Axis Bank

    9. Enter Beneficiary Details -

    • Enter Nick Name ( You can take anything what ever  you want )
    • Enter Beneficiary Account Number – Recheck bank account number once more after entering to avoid human error.
    • Get Account Details to see the same person to whom you want to transfer the money, this record  will be displaying from bank data itself.
    • Click on Submit


    10.Verify Beneficiary Details-

    • Enter your Internet banking Login ID and Transaction password.
    • Enter Net secure code which has sent on your mobile.

    11. Activate Beneficiary / Payee for  Making a transaction.

    ( If your mobile is not registered then first need to register your mobile with bank and you should also have Net Secure Service from Axis Bank)

    So Now you have added a successfully Payee and activated Payee for a Fund Transfer in Axis Bank from Axis Bank.

    Steps for Fund Transfer from Axis Bank Account to Other Axis Bank account –

    1- Select Other Axis Bank Account from Left Menu from My Accounts > Transfer fund to.Right side a  List of Payee will be displayed in the list.
    2-  Select added Payee from circle click.
    3- Click on Pay Now Button
    4- Enter Payment Details -: Enter Payment Amount which you need to transfer to Payee.( For checking you can choose very less amount like 50 - 100 Rs.
    5- Payment Account No- From where you are transferring money to Payee account.
    6- You can payment remark to see the transaction like “from Your Name”.
    7- Click on Pay button once again.
    8- Verify Details -: Enter your Login Id, Enter your Transaction password and Net Secure code which has sent on your mobile.Some time bank is not asking for the Net Secure code in case of less amount transfer.
    9-    Click on Validate
    10-  Confirmation : - You have successfully transferred amount to Other Axis Bank account.
    11-  Check status of your transfer in Other Axis Bank account - Status Enquiry, close Website or Browser after doing transaction.

    It might take 1-4 working days to transfer your amount to Payee account, Generally credited in second day in a Payee account.

    Keep in Mind Don't / Does While a Money Transfer  -

    • Do not share Internet banking Login ID, Login Passwords, Transaction Password with others, even need not to share with customer care or in any mail.
    • Do not do any transaction in front of other person.
    • Do not send ATM Pin , Username and Passwords in Mails to anyone.
    • Do not store username and password in e-mails /  mobiles.
    • Do Sign out / Log out after completing a Transaction / Transfer. 
    • Close Browser  completely after making a Transaction / Transfer.

    How To Setup Google Webmaster Tool For Your Website or Blog

    Google has provided free Reports to see you’re crawling and indexing of Pages. You can get answers of all the questions? How many Inbound links and outbound links are linked to your website? How many search queries have done for your website or blog? How many clicks have done so for search queries? What is position of your website in Google Search base on Google Keywords? How many page impressions are being done every day for your website? How many pages are visible in Google Search? You can analyze a search data to improve Page Ranking. Google Tracks all the links all over web and if anyone linked to your website then Google Webmaster Tool will display this in the report. If your page or website is not indexed then you can tell to Google by submitting sitemaps that this website or particular web pages are need to be indexed.
    Google Webmaster Tool Snapshot

    I will be covering first how to setup webmaster tool for your website or Blog and also I will show you how many reports are essential for analyzing a Data.

    Setup a Google Webmaster Tool in Few steps:
    1. Login in www.google.com/webmasters/tools/ with Google Email and Password.
    2. Click on Add a Site Button
    3. Enter the URL of a Website or Blog which you like to manage.
    4. Verify Ownership:
    Choosing below any option you can tell to Google that I am owner of a website or a  Blog.
    • Add a DNS record to your domain’s configuration -: If you have DNS configuration with you, then you can enter Google Verification token in the setting. Select your domain provider.
    • Add a Meta tag to your site’s home Page -: This is very simple option to verify the ownership. You need to put a HTML Meta Tag on your site to verify an ownership.
    • Upload an HTML file to your Server :- If you are uploading Google verification HTML file on your server as given instruction by selecting an option, will secure to Google that you are owner of a website
    • Link to your Google Analytics Account :- If you have already setup a Google Analytics Account then choose this option, No need to required further verification for setup of Google Webmaster Tool.

    I recommend you the second option (Add a Meta Tag to your site’s home page), If you do not want to choose others. As you select the second option the Meta tag will display on the same page, You need to simply copy the Meta tag and put inside head tag in the HTML of Your webpage.If you are blogger user then you need to follow below steps to put the Google verification code.

    How to put Google verification code in Blogger :-
    •  Login into Blogger account
    •  Go in Design > Edit HTML Tab
    •  Search for <title> Tag
    •  Paste Google Verification code after the Title Tag.

    5. Click on Verify Button

    You have been successfully verified by Google for your ownership of the website or Blog.Later on you can  see the status of your Website or blog using below listed features.

    List of Google Webmaster Tool Features -:
    • Search Queries - You can see status of Search impressions, Queries and no of clicks done in Google Search when your website appeared in Google web search.
    • Links to your Site - It will display the list of internal links and external links, internal links are inbound links which are linked with your Website pages. External links indicates that how many others have linked to your website or Blog.
    • Keywords- Google found these keywords when crawls your website.
    • Crawl Error- It shows list of errors while your website has been crawled by Google, Generally it shows error for broken links, missing URL, deleted pages.It also shows error for restricted URL or pages.
    • Sitemaps - If  your website or a particular page never been indexed to Google then you can tell to Google for indexing the website or page by submitting the sitemap.