You can easily transfer money to Payee account who is holding an account of an Axis bank and you are also holder of an Axis Bank Account. For a small task you don't need to bother about writing a cheque or do not need to go to payee place for giving a cash.You can transfer online money in few steps If you have Internet banking Login ID, Login Password and Transaction Password with you.
What is Login ID: Login ID is your customer ID or Username which is use to login in Axis Bank website.
What is Login Password : Login Password is password which is you need to provide when you are log in into Axis Bank Website.
What is Transaction Password : Transaction Password is a another password which is use for validating your transaction like transferring amount,adding payee, deleting payee etc.
If you do not have Internet facility on your account then contact to branch of Axis Bank.You need to register first Payee details, follow steps as written below as I have explained in the details.
Register Payee / Beneficiary Details –
1. Open website www.AxisBank.com
2. Left Side Net Banking Section – Click on Logon
3. Click Here to Continue
4. Enter your Login ID and Password.
5. Click on Submit Button.
6. Choose Transfer Funds Link from Grid.
7.Choose Other Axis Bank Account from Transfer Funds to.
8.Click on Register New Beneficiary Button.
 |
| Register a Beneficiary for Axis to Other Axis Bank |
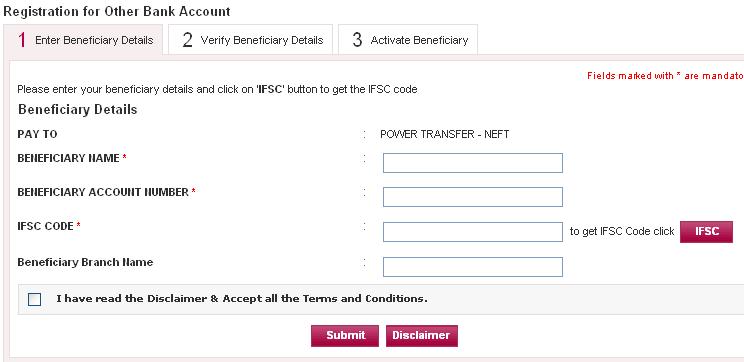
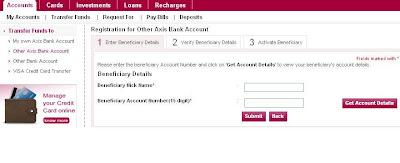
9. Enter Beneficiary Details -
- Enter Nick Name ( You can take anything what ever you want )
- Enter Beneficiary Account Number – Recheck bank account number once more after entering to avoid human error.
- Get Account Details to see the same person to whom you want to transfer the money, this record will be displaying from bank data itself.
- Click on Submit
10.Verify Beneficiary Details-
- Enter your Internet banking Login ID and Transaction password.
- Enter Net secure code which has sent on your mobile.
11. Activate Beneficiary / Payee for Making a transaction.
( If your mobile is not registered then first need to register your mobile with bank and you should also have Net Secure Service from Axis Bank)
So Now you have added a successfully Payee and activated Payee for a Fund Transfer in Axis Bank from Axis Bank.
Steps for Fund Transfer from Axis Bank Account to Other Axis Bank account –
1- Select Other Axis Bank Account from Left Menu from My Accounts > Transfer fund to.Right side a List of Payee will be displayed in the list.
2- Select added Payee from circle click.
3- Click on Pay Now Button
4- Enter Payment Details -: Enter Payment Amount which you need to transfer to Payee.( For checking you can choose very less amount like 50 - 100 Rs.
5- Payment Account No- From where you are transferring money to Payee account.
6- You can payment remark to see the transaction like “from Your Name”.
7- Click on Pay button once again.
8- Verify Details -: Enter your Login Id, Enter your Transaction password and Net Secure code which has sent on your mobile.Some time bank is not asking for the Net Secure code in case of less amount transfer.
9- Click on Validate
10- Confirmation : - You have successfully transferred amount to Other Axis Bank account.
11- Check status of your transfer in Other Axis Bank account - Status Enquiry, close Website or Browser after doing transaction.
It might take 1-4 working days to transfer your amount to Payee account, Generally credited in second day in a Payee account.
Keep in Mind Don't / Does While a Money Transfer -
- Do not share Internet banking Login ID, Login Passwords, Transaction Password with others, even need not to share with customer care or in any mail.
- Do not do any transaction in front of other person.
- Do not send ATM Pin , Username and Passwords in Mails to anyone.
- Do not store username and password in e-mails / mobiles.
- Do Sign out / Log out after completing a Transaction / Transfer.
- Close Browser completely after making a Transaction / Transfer.